
I can’t even count the number of times I’ve stressed the importance of adding images to your blog posts. There’s nothing worse than clicking on a link someone tweeted, only to be met with a huge wall of text!
The good thing is that it seems like more bloggers are starting to get the message (thanks to posts like this, this, and this). The bad news is that a lot of bloggers are adding images the wrong way. Whether it’s stretched out pixelated images, using crappy stock photos, not properly tagging pics, or uploading oversized pics that slow down your site, all these problems can take away from the quality of your blog posts that you’re working hard to make!
But there’s hope! I’m going to show you how to add pics to your blog the right way, so that you can take advantage of everything visuals have to offer for us bloggers. You’re going to learn:
- Why images are so important for blogs
- How to pick the right type of pics for each blog post
- Where to find images for your blog posts that you can use legally
- How to make images with social media in mind
- How to make custom graphics for your blog posts (even if you suck at graphic design)
- How to optimize your blog’s images for SEO
- How to upload pics to a WordPress blog (sorry Drupal and Joomla peeps!)
That list might seem like a lot of info, but trust me, it’s actually really easy and one of the funnest parts of blogging. You’ll be filling your blog posts up with eye-catching pics in no time!
Why Images Are So Important For Blogs
First and foremost, they break up the monotony of just having blog posts filled with straight text. Nobody wants to read that. It’s visually unappealing, and scares off readers.
Second, social media and blogging are basically blood brothers, or at least close cousins. Getting traffic from search engines is awesome, but if you’re not taking advantage of social media to get people on your site, you’re missing out big time. Social media drives 31% of traffic to all websites. It’s my second highest traffic source behind search. And what get’s shared the most on social media? Images. By adding pics to your blog posts, you’re really increasing the likelihood of people tweeting, pinning, and liking your content.

Another reason images are important, that tends to get overlooked a lot, is that some points are a lot easier to convey in a picture than with words. In some cases, a picture really is worth a thousand words. Some of your readers are going to be visual people that would rather see stats in a chart or graph, than a bunch of numbers written down.
Lastly, images really help your blog out with SEO. One of my old blogs got a lot of traffic from people who were finding images I had ranked in the “Image Search” part of Google. For certain searches, Google will even show images right on the organic search results on top of everything else. So if you have an image that shows up in one of the first few image slots, you’ll have an extra opportunity to get people to your site.

Basically, add pics to your blog posts people!
When To Use Images In Posts
What I’m about to say might shock you. But not every post needs to be filled with images! I think that’s a big misconception people get when they hear bloggers talk about the importance of adding pictures to your content.
Yes, you should add pics. But only when it makes sense. Don’t just add pics for the sake of adding images. You’ll notice that in some of my posts, the only image in the entire thing is the featured image at the top. That’s because there wasn’t really a need for more pics inside the post. But keep in mind, you have to break your content up with headings, lists, bold text, italics, and other things so that your posts are still easy to digest, even if you don’t have 5 images in them.
Here’s my general guidelines for when it’s good to add an image in your posts:
- To emphasize a point
- For list posts like this
- When you’re doing a step-by-step walk through (like my guide on how to embed Pinterest pins and boards)
- When you’re dealing with a lot of data and stats (here’s a good example)
- When you’re talking about a physical product (check out this awesome example from Engadget)
- To give an example
It’s all about making sure the image is adding something to the post, and not just there because you feel like you have to have an image somewhere. Before you add an image to your blog post, ask yourself one question, will it make the post better?
How To Pick The Right Type Of Images For Your Blog Post
This is a pretty important topic, and something that hits really close to home for me. I’m not ashamed to admit (ok, maybe I am a little bit) that when I first started blogging, my sites were filled with pics like this:

You probably fall into either one of two categories:
- You’re laughing that I used pics like that
- You cringed because you know your blog is filled with the exact same type of pics
Believe it or not, the problem with pics like that isn’t that they’re stock photos. The real problem is that when most people use them, they choose ones that aren’t even relevant to the topic of their posts. I’m not going to name names, but we’ve all seen business blogs that just have random images of a guy holding a suitcase or a group of people sitting at a desk, just because the post is about productivity.
There’s nothing wrong with using stock photos. But you have to do it the right way, and when it’s appropriate. So how exactly do you pick the right photo? It depends….
The main types of images that you’ll end up using on your blog are:
- Stock photos
- Creative commons images
- Infographics
- Charts/graphs
- Screenshots
- Custom graphics
Stock Photos
These are photos like the “Success” one I put above. They’re generic, and it can take a while to find good stock photos, unless you’re willing to pay. Luckily, there are some great sites out there where you can get awesome stock photos that don’t look like crap. I’ll get to those later.
If you’re going to use stock photos, I highly suggest customizing them somehow. Whether it’s laying some text over it with Canva, using Photoshop, or anything you can do to make your stock photos not look super plain, make sure you do something. There are plenty of tools out there that make it easy to add nice looking text to photos, so start using them. I’ll give you suggestions in the section on tools.
Only use stock photos that are relevant to the point you’re trying to make. And pick ones that don’t look like super cheesy.
Creative Commons Images

If you search for things like “free images for bloggers”, you’re going to see the word “creative commons” come up a lot. These are basically pictures that don’t have all the restrictions that stock photos from sites like Getty Images have. I like to think of them as open source pictures. Basically, people share their photos under the Creative Commons License so that other people can use them for free, edit them, or add to them. You can find out more about Creative Commons here.
Here’s the issue with Creative Commons photos, the quality of the pictures isn’t on the level of what you might get in stock photos. A lot of them are ones that everyday people take and upload online. They aren’t super “professional” for the most part.
Just like with stock photos, you’re going to want to customize them most of the time, to make them a little more appealing and relevant to what you’re writing about.
Something to keep in mind with Creative Commons photos is that a lot of times you’ll have to give attribution for the photo, which basically means to give credit to wherever you got the picture from. For instance, for the photo above with the bikers, the attribution looks like this.
photo credit: Sterling Classic Bike Race via photopin (license)
Infographics

You all know what infographics are. They’re at the top of the list of types of images you should use in your blog posts. In fact, they’re so effective that Neil Patel over at Quicksprout publishes one every Friday because of all the social shares, backlinks and traffic they bring in.
When you’re dealing with stats, trends, or a lot of related data, then infographics make a lot of sense. The downside to them is that they take a lot more time to put together than just getting a stock photo. There’s tools that make it easier like Piktochart and Canva, but they still require a good amount of time and effort to make because you have to get all your data together, and then design it.
Something that I’ve done, and recommend, is to take old blog posts and repurpose them into infographics. Infographics don’t always have to be filled with stats. You can make a “how to” style infographic or turn list posts into infographics too. Here’s some general tips for making infographics:
- Keep a consistent color scheme throughout the entire piece so it’s cohesive
- Include a link to your site in the footer so people know you made it
- Make it easy for other people to embed it into their own blog with this nifty little tool
- Share it like a mofo on social media
Charts and Graphs
Sometimes you don’t have to go through all the trouble of making an entire infographic for stats and data. If you’re showing the results of a poll, or have the results from a case study with a few pieces of data, then it might make more sense to use a chart or graph.
For instance, when I mentioned how social media was my second largest traffic source earlier, I included an image of a chart, because there really wasn’t enough info to do an entire infographic. When Moz does there annual Local Search Ranking Factors survey they use a chart to show the results, because it gives people the data they need in a way that’s easy to consume. No need for a huge infographic.
There are plugins that let you make graphs and charts, or you can just grab a screenshot like I did.
Screenshots

If you’re doing walk throughs, reviews of software, or tying to show examples of something on a computer, screenshots rock. Grabbing a quick snippet of your screen lets your audience see what you’re seeing, so things are easier to follow.
For instance, in my Ninja Outreach review, I included a bunch of screenshots of what the software looks like. Imagine how ineffective that post would be if I didn’t include any screenshots and just talked about the tool.
Screenshots are really good when you’re doing tutorials. It’s a lot easier to follow instructions when you can actually see what the steps are supposed to look like. WPBeginner does a really good job with their tutorials because they have photos for each step of their guides so you’re never lost.
You can use any tool you want to get screenshots from your computer. Here’s the Google Chrome extension I use. And I’m pretty sure Evernote has a tool for grabbing screenshots too.
Custom Graphics/Illustrations

With custom graphics, you don’t have to worry about copyright problems, finding the right photo, or any of that annoying stuff. You’re creating a completely new and unique image. A lot of the featured images I use for my posts are custom graphics. They’re not anything super fancy, but they do a good job of visually representing what the posts are about, and they work well with Twitter cards.
Custom graphics are ideal for people who are artistic and good with graphic design. The Oatmeal was pretty much completely built on the concept of custom graphics. Custom graphics stand out because they don’t look generic like stock photos, and if they’re done well, they’re really eye catching.
If you’re making something simple like what I do for my featured images, it’s not a huge deal. But when you’re making complete custom hand drawn illustrations, then things get more complex. It’s nice to mix these types of images in when you can, but don’t spend hours and hours making one image for a post.
And of course, you can also take your own photos with an HD camera and use those. Just make sure you follow the steps in the section later on about optimizing images for SEO if you’re using your own photos.
Where to find free images for your blog posts that you can use legally
This is a really important topic because it’s something that almost every first time blogger struggles with when they’re getting started. You want to use high quality photos on your blog, but you’re not trying to pay $20 to get them.
I’m going to be 100% honest with you here. In my early days of blogging, I was straight up grabbing images off Google without a care in the world. Occasionally, I still do just use Google and get photos that look stock, but that’s really not something you should do for legal reasons. It’s very unlikely that anyone is ever going to actually sue you over using a stock photo, but it’s better to do things the right way.
So, if you’re not taking pictures from Google, and you’re also not buying them, where do you get free images to use on your blog?
There’s actually a lot of sites. The good folks over at Buffer made a huge list of over 50 of them. Feel free to check that out, but I’ll give you some of my personal favorite sites to get free stock images that you can use 100% legally on your blog.
Gratisography: You’ve probably seen various photos from this site all over my blog. It’s my go-to place for really high quality stock photos. (If you use a lot of his photos, give a donation to the site. He seriously produces some of the best free photos you’re going to find, so show your appreciation!)
Startup Stock Photos: This is a much better alternative for business stock photos than those generic “everybody look at the camera and smile with your thumbs up” photos that sites charge money for.
Photopin: Photopin is one of the very first sites I stumbled on a while ago that lets you search for Creative Commons pictures. They pull from different sources like Flickr, and only show you results that are under the Creative Commons license, so it takes a lot of the work out of searching. You’ll have to do some searching to find high quality pictures, but there’s some nice nuggets in there.
Picjumbo: Next to Gratisography, Picjumbo is one of my favorite places for high quality free photos. They have a bunch of different categories to choose from, and their library is constantly growing.
Clker: Sometimes you might just want some clipart to make your own custom graphics. Clker has a ton of free clipart that you can use freely. I’ve been using it for years.
There are plenty of other sites you can get free photos from, but those are my go-to sources. And in case some of you don’t mind paying for stock photos, my number one choice for royalty free stock photos is Photodune. It’s a marketplace from Envato, which is the same company behind Themeforest. They have a ton of photos on nearly any topic you can imagine.
Even though I really highlighted the sites that have free photos, there are advantages to using paid stock photos:
Some exclusivity: Most bloggers know about the free photo sites, so the images get used A LOT. With paid sites, since you have to buy the photos, there’s a lower chance of people using the same photos.
Specific images: With sites like Photodune or Shutterstock, you can be really specific on the type of image you want, no matter how odd it might be. Whether you want a photo of a woman squeezing lemons or a dog licking a lollipop, you can find it. With the free sites, you’re kind of limited to whatever they have available.
High quality photos: Aside from a select few sites like Gratisography and a few others, you’re not going to find a bunch of HD quality stock photos for free unless you start searching the paid sites.
My suggestion is to use a mixture of different photo sources, and always try to customize the images whenever you can, even if it’s just adding text over the image. The most important thing is that the images you use are relevant.
Making Images With Social Media In Mind
Did you know that different social media sites have different size requirements? This is really important to know if your posts are being shared a lot on a specific social media site.
When you add images inside of your posts, and you want people to be able to easily tweet the image for example, you’ll want to make sure that it’s specifically sized to show up completely in Twitter without being cut off or resized incorrectly.
Here’s the right dimensions for images for each social network:
- Facebook: 1200×1200
- LinkedIn: 1200×1200
- Twitter: 1200×627
- Facebook shared links: 1200×627
- Pinterest: 736×1128
- Google+: 736×1128
And a nice little graphic from Constant Contact:
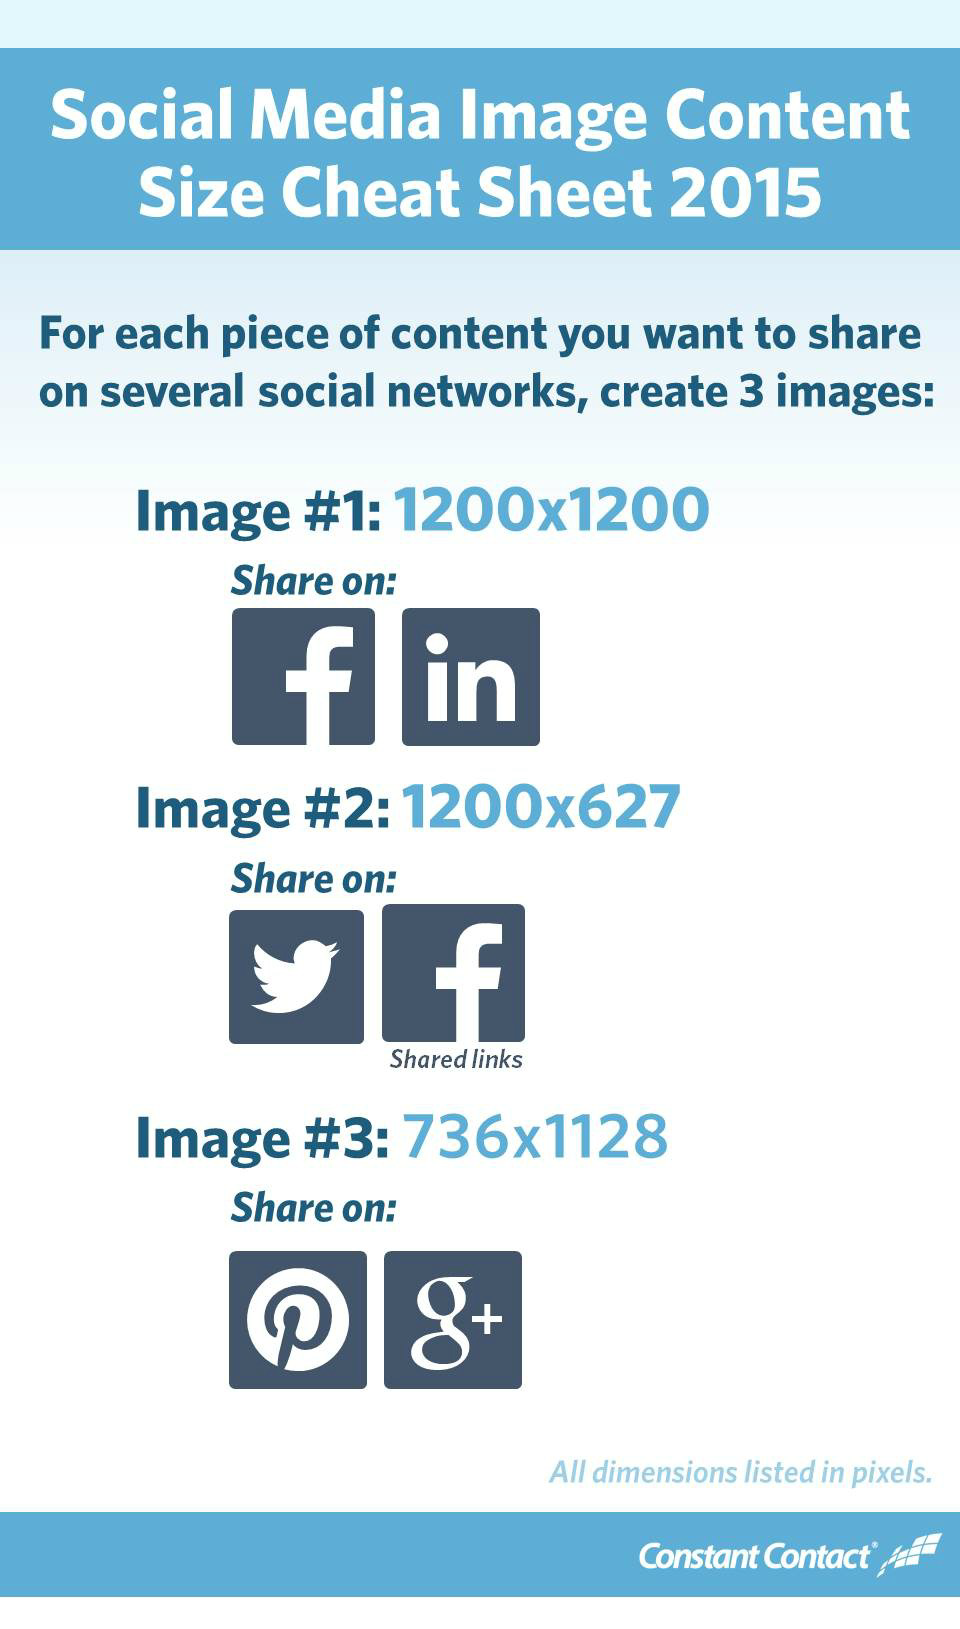
This data is current as of 2015, but keep in mind that it could change. If you don’t want to memorize the numbers, you could either bookmark this post to come back to later :), or you could do what I do and just use Canva for your photos. They have the right sized templates for any social media graphic you want to make. Then just upload it to your site and insert it into your posts. Whenever anyone wants to tweet or pin a specific image within your post, it’ll be perfectly sized and ready to go!

How To Make Custom Graphics For Your Blog
I wrote an entire blog post on this exact topic, because it’s something that I’ve struggled with for a long time. In that post, I listed 5 specific tools/resources that I use to make graphics:
- Canva: I’ve talked about it a lot already, but it’s a great way to make different sized images and completely customize them so they look professional and high quality. A majority of my graphics are made with Canva.
- Piktochart: This is a great tool to use if you want to make an infographic. They have plenty of templates that’ll help get you started, or you can make one completely from scratch if you’re up for a challenge.
- Hipster Logo Generator: This is more for creating badges and logos, but you can use it to make some pretty cool looking graphics to include in your blog posts.
- Pablo: If you want to make one of those trendy looking photos+text graphics that get shared like crazy on social media, Pablo lets you do it EXTREMELY quickly.
- Graphic River: Also owned by Envato, it’s a great place to get templates to use to make graphics in Photoshop and InDesign.
For those of you that are good with graphics, get your Photoshop on. But if you’re trying to make something fairly quickly that looks awesome and custom, then you really can’t beat these tools.
When you’re making custom graphics for your blog, something to keep in mind is that it’s a good idea to have your logo or your URL somewhere in the image. If it starts getting shared, you want to make sure that you’re getting credit, and it can also bring in some new traffic from people who found the image on another site. It also helps stop people from stealing your graphics and claiming them as your own. Believe me, it happens all the time….
If you’re not the greatest at graphic design, don’t worry. Like I said, I’m not great at it either. But the more you practice and start learning about different design concepts, and get a feel for what fonts and colors go well together, you’ll get better. If you saw some of the graphics I was putting together a couple years ago in Gimp, you might think I was blind. But now, I’m able to make some pretty good looking custom graphics!
How to optimize your blog’s images for SEO
I mentioned that having images in your blog posts helps with your SEO. But in order to get those benefits, you have to do it the right way. The easiest way for me to show you how, is to walk you through my process for adding images into my own posts.
Let’s say I have a post reviewing the GoPro camera, and I want to use this image (courtesy of Gratisography). Here’s how I would optimize it for SEO.

Step 1: Resize Your Image
One of the biggest mistakes that bloggers make is ignoring the size of the images they add to their site. Even Buffer admitted they fell short in that department. You want to make sure your images are in the right size in terms of pixels AND actual file size.
The pixel size of your images will depend on your site’s design most of the time. For my site, I like my images to be around 600px wide. For the file size, you want it to be as small as it can be without losing the quality of the image. JPEG’s are going to smaller than PNG or GIF files most of the time. Image file size is one of the factors Google looks at for on-page SEO, and it also affects your blog’s load time, so don’t skip this step.
Keep in mind that if you’re using photos that you took with a camera, the files are going to be HUGE. This is super important if you’re a DIY blogger, crafts blogger, food blogger, fashion blogger, or any type of blogger that uses a lot of photos that you take yourself on your blog. Don’t download the file from your camera, and then immediately upload that file to your blog. You have to resize it first.
The tool I use to resize my photos before uploading them to my blog is Picresize. It’s completely free and really easy to use. You just drag and drop your image, choose your file size, resize it and save.
The original image was 5333×3555 pixels and 4.23mb/4340kb


The resized image is 600×400 and 60kb, and it didn’t lose any quality.
Step 2: Rename Your Image File
The next thing you want to do is make sure the file name for your image contains relevant keywords. When you buy a stock photo or download a free one from one of the sites I mentioned, it’s more than likely going to have a generic file name or a string of random numbers. Don’t upload an image to your blog with the file name IMG003.jpg.
The reason why, is because when search engines crawl your website, they read the image file name to help determine what the image is about in order to match it to different search queries. IMG003.jpg isn’t descriptive at all, so you’re losing out on SEO value.
The original file name for the picture was 200H. I changed the file name to “GoPro Review” to make it more relevant to our pretend blog post.
Step 3: Set the Alt and Title tags
These two tags are really important for helping search engines determine what your images are, and how they relate to the overall topic of your blog post. I’ll quickly break down what each one is:
- Title tag: This is basically a short description of what the image is. It’s the text that shows up when you hover your mouse over an image.
- Alt tag: This is what web browsers display if your image doesn’t load. You know, when that red “x” shows up instead of your actual picture. It’s mainly there for website accessibility reasons.
Here’s a video that explains the difference a little more.
Adding alt and title tags is really simple to do, but it’s something that a lot of bloggers overlook because they either don’t know how, or don’t realize they should be doing it.
There is one tricky part involved though if you’re using WordPress. When you first upload your image to WordPress, there’s the option to add Title, and also Alt Text. The “Title” part is not the same as the title tag. That title is the image’s title within WordPress. You have to add the actual title tag in after you’ve inserted the image. Don’t worry, I’ll show you how!
1. Add media
2. Drag and drop your image
2. Add title (remember, this is not the same as the actual Title Tag**) and the Alt tag

3. Insert into post
4. Click on the image>Edit

5. Go to Advanced Options>Add your title tag here, then click update.

Now, when you hover over your image, you should see the title tag displayed. And the final result for our experiment looks like this:

Step 4: Add a caption (optional)
I generally don’t add captions to my images, but it’s not a bad thing to get in the habit of doing. Captions are a good way of describing what your image is, which is great for SEO and your users. And it only takes about one second to do. In WordPress, you just have to fill out the caption part that I left blank in the example.
And as the people from Social Triggers pointed out from a quote in one of my favorite books, Ca$hvertising:
[Tweet “studies have shown that up to twice as many people read captions as body copy…”]
I have to give a quick disclaimer. There are some different WordPress plugins that’ll automatically add in alt tags for your images. I don’t recommend them. The reason why is because they tend to just use your blog post’s title as the alt tag, which means a lot of your images will have the same alt tags, and they might be irrelevant to the actual image. It takes less than a minute to add the alt tags manually, so don’t get lazy on me!
That’s all you need to do to make sure your images are optimized for SEO! Simple, right?
Wrapping It All Up
Over 4,500 words of pure awesomeness on what you need to do the next time you add images to your blog posts. Don’t underestimate the power and value of adding images to your blog posts, and doing it the right way. You’re going to be miles ahead of other bloggers if you start implementing everything you just learned, and it’s so simple and easy to do!
Have any other questions about adding images to your blog posts? Let me know in the comments or tweet me! And I’d love it if you could share this bad boy with everyone you know!


