
You want to get more active on social media, but can’t seem to keep up with a consistent publishing schedule. It happens to the best of us. Trying to create content for your site takes up enough of your time, but then trying to fit in the time to share even more content on Twitter, Facebook, Instagram and other social media accounts is another beast.
In this post for The Cosmo Project, I’m going to go over how I handle my social media posting for the site in less than one hour a week.
[alert-note]This post is a part of the Cosmo Project, a content marketing case study I started in January 2016. You can find all of the posts in the series here.[/alert-note]
The Tools
The two tools I use to schedule my social media posts are Buzzsumo and Sprout Social. I use Buzzsumo to find content to share, and Sprout Social to schedule it out.
A social media tool that allows you to schedule your posts ahead of time is an absolute necessity! If you’re still publishing all of your social media posts directly through Twitter or Facebook, you need to upgrade. You’ll save a ton of time using a social media dashboard. Just for starters, some of the other benefits are:
- Analytics for the content you’re publishing (see what content is the most popular)
- Demographics about who your audience is
- It’s easier to track your conversations
- You can manage all of your accounts from a single dashboard
Long story short, use a social media scheduling tool and keep your sanity.
Buzzsumo isn’t 100% necessary for this, but it will make your life A LOT easier and get you better results. Buzzsumo helps you find highly shared content around the web based on the keywords you enter. The benefit here is that you’ll know that your audience enjoys the articles you find through Buzzsumo because they’ve already been shared a bunch.
Now that you have your tools ready, let’s dig into the strategy. I’m going to focus on Twitter, but the same steps would apply for pretty much any social network you’re using.
Step 1: Find Content Through Buzzsumo
The very first thing I do is search Buzzsumo for different phrases related to Cosmo’s niche/industry. Let’s use this site as an example for now though.
I did a search for “content marketing”. You’ll see some settings you can change on the left hand side. I like to look for posts within the past week to get current topics. And I also uncheck “Giveaways” under content type because I only want to share articles and videos.
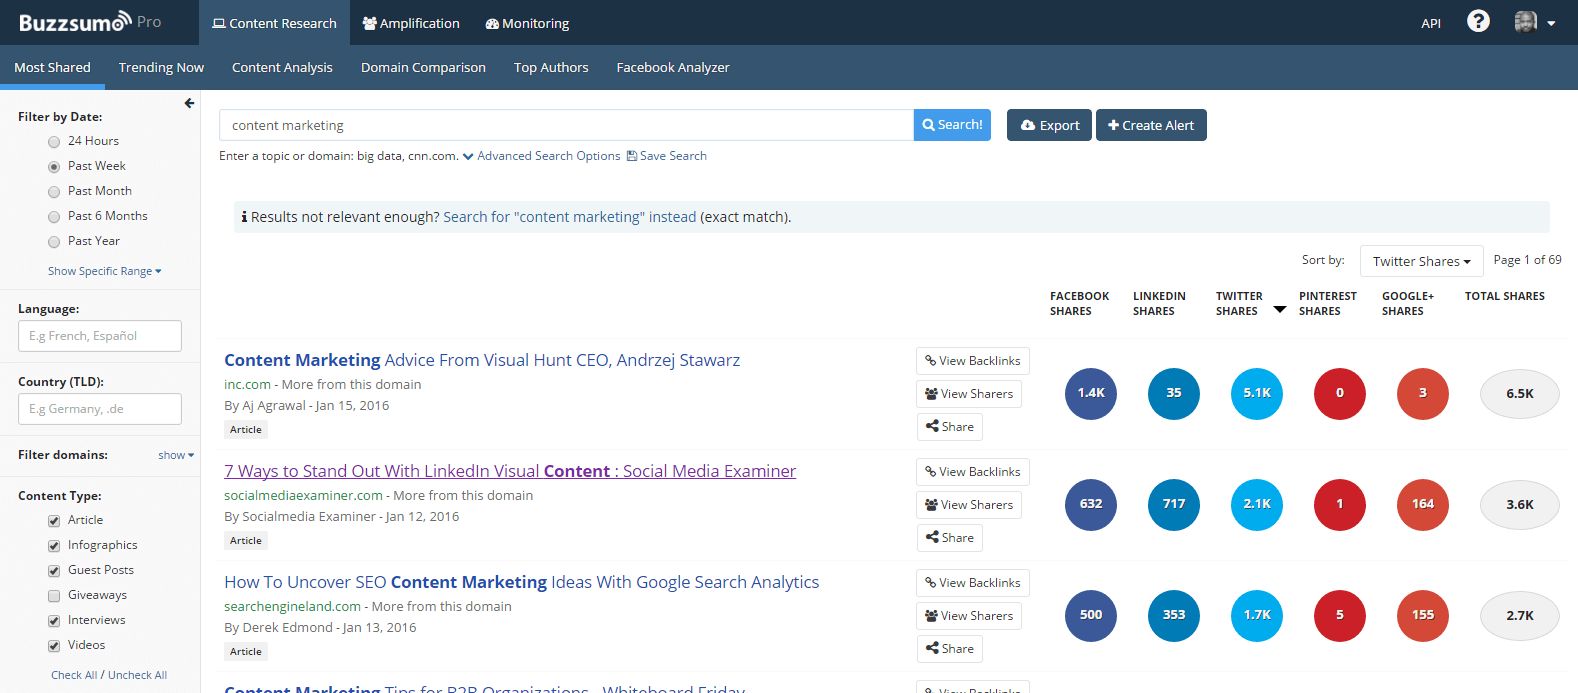
Now you should have a bunch of articles to choose from. Feel free to search for a few different keywords or phrases related to your niche to add some variety to the content you share.
Next, pick one of the articles you want to share. Clicking on any of the article titles will open it up in a new tab. I always recommend actually looking at the content before sharing it to make sure it’s something your audience will like.
Step 2: Find The Author
Ok, so I like the “7 Ways to Stand Out With LinkedIn…” article. What most people do at this point is just share the article. But in order to get better results, I take the extra step to make sure I’m giving credit to whoever created the article.
With this LinkedIn article, it’s on Social Media Examiner, but SME has content from several different writers. So I need to find out who the actual author is, so I can give them an @mention in the Tweet.
It may seem like it’s not worth the extra time or effort but here’s why I like to do it. For one, the author will get a notification when you mention them on Twitter, and there’s a good chance they’ll Retweet you. That exposes your Tweet and your profile to their audience. Also, it’s a great way to start connecting with influencers. If you’re constantly Tweeting out their content, you’re going to get on their radar and at the very least get a follow.
This technique has been pretty important for The Cosmo Project because the site is a complete unknown in the industry. By @mentioning different influencers, it’s helping me build more awareness. I’ve earned new followers just from @mentioning people when I share their content.
You can usually find out who wrote the article somewhere near the title of the post.
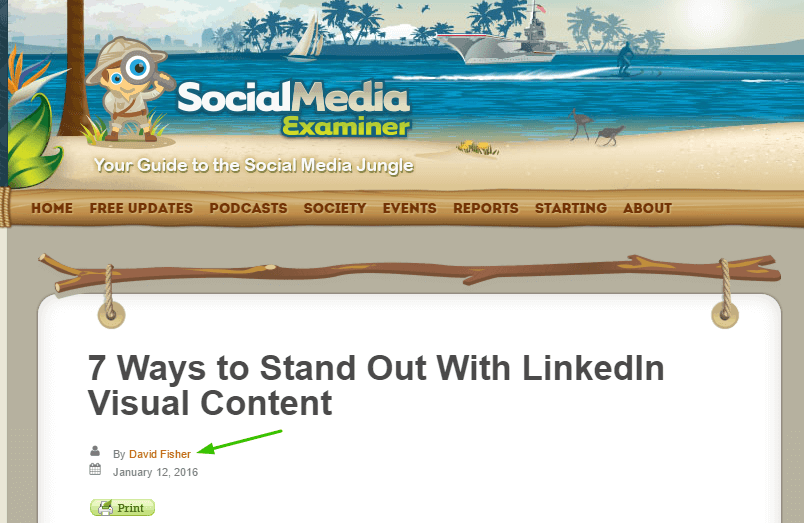
Here, I can see that David Fisher wrote the article. So next I want to find out what his Twitter handle is so I can include it in the Tweet. A lot of sites will include this in the author’s bio at the end of the article. Let’s see what we can find here.
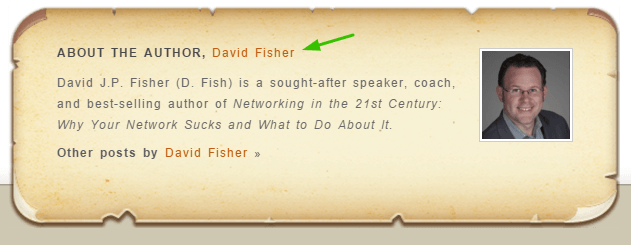
So there’s no link to or mention of David’s Twitter profile in the bio. But they link to David’s site. So I click on that link to go to his site and what do I find?

Finally! We have the link to his Twitter profile.
Don’t worry, you won’t have to go through all of that every time. In most cases there’s a link to the author’s Twitter profile in the bio or the blog will be written by one person. But I wanted to use this example to show you the worst case scenario. Even if you have to go through these additional steps, it takes less than a minute so it’s no biggie.
Step 3: Crafting Your Tweet
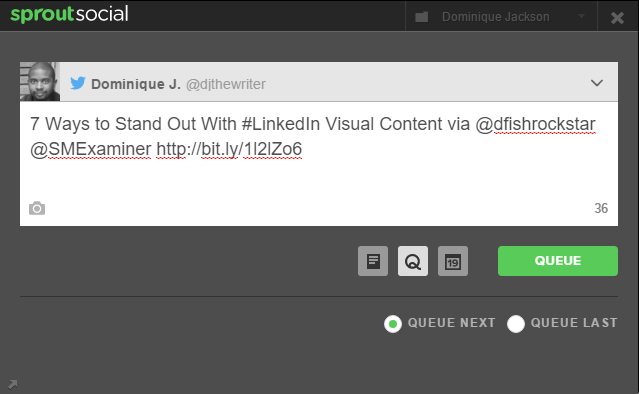
This step can be different depending on what social media scheduler you’re using. I’m going to show how to do it in Sprout Social, since that’s what I use. I have Sprout’s browser extension installed so I can share the posts without having to leave the tab. There’s three things I try to include in each Tweet:
- A headline: I’ll usually just use the blog post title IF it’s enticing enough.
- Hashtag: I like to include a relevant hashtag when it makes sense. It helps make your Tweets more discoverable.
- @Mention: Like I said, I like to @mention the author when I can find the right information. I also @mention the site the article is published on.
Pull it all together and we have this Tweet!
Step 4: Scheduling Your Tweet
As you can see in the screenshot above, Sprout has a feature that will choose the best time of the day to share your content (ViralPost). All I have to do is click on the “Q” and choose whether I want this Tweet to be sent out next in my queue or last, then click the green button and I’m done.
You could also click on the calendar icon and schedule the Tweet out manually. This feature is cool because you can schedule the same Tweet to be sent out on multiple days and at different times.
But for scheduling mass posts, I just use the Queue/ViralPost feature because it’s quicker and gives me better results. Within Sprout, you can adjust the settings for ViralPost. Here’s what mines look like. I use the same settings for Cosmo as I do for my personal Twitter.

I have it set to Tweet five times per day on the weekdays between 8AM and 10PM. That means I only have to load up 25 posts to share each week. Now, in between this time I’ll manually shoot out Tweets as well. But this technique helps me ensure that I have content going out on Twitter no matter what.
After you load up all of your Tweets for the week, you can see them all on your calendar within Sprout.
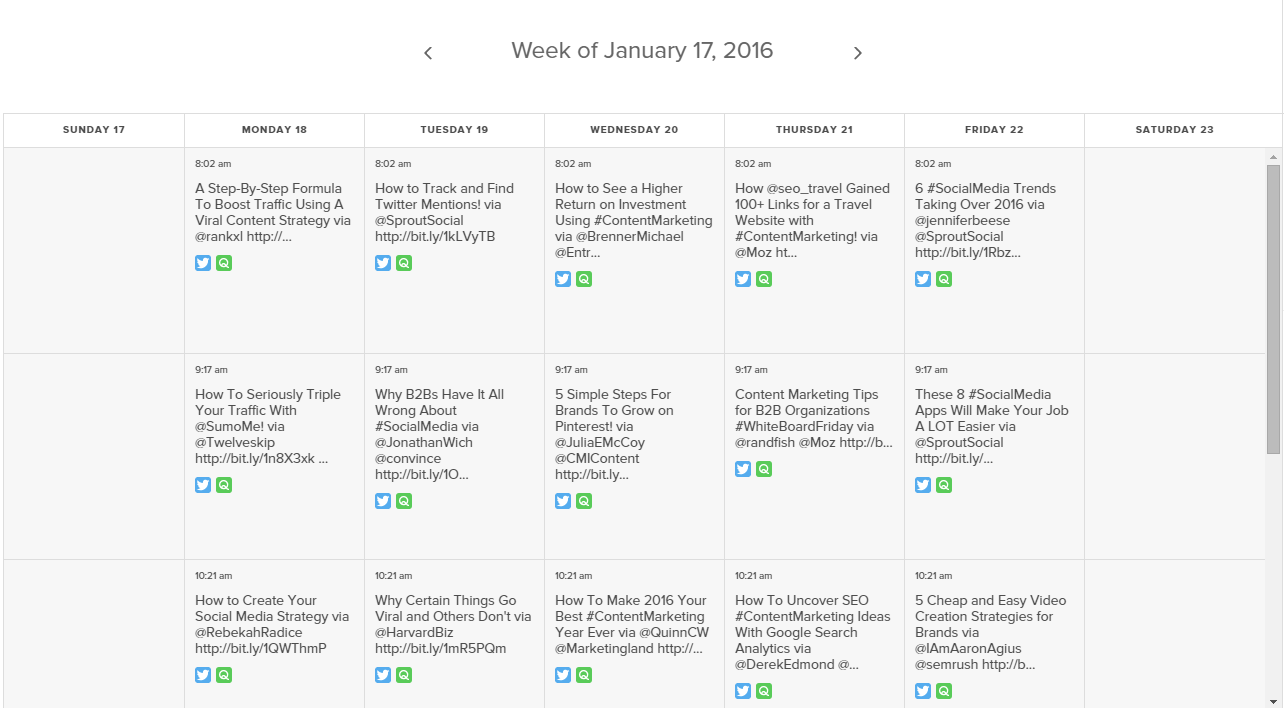
I like to handle all of my scheduling for the week on one day, usually Saturday mornings. I easily get all of this done is less than an hour. The only time consuming task is finding the author’s Twitter handle sometimes, but even that’s not too bad. I’m usually able to finish in about half an hour or so.
No Excuses!
Do you have a 30-60 minutes in an entire week? If not, you need to work on your time management buddy! With this strategy there’s absolutely no excuses for not being able to publish content to social media. Anyone can do this. Give it a try and you should start seeing a lot more activity for your social media accounts!
I’ll see you all in the next post!

")

Hey Dominique! Been a while since we connected! Good to know that your project is going well. I haven’t used Sprout Social but looks like its worth the experiment. Thanks for sharing your insights!
Thanks Priyanka! Love the new site design by the way.